 この季節は天気予報が頻繁に変わるのに気づきます。PCやスマホなどで見れば豊富に出てくるわけですが、この際は、常時表示してくれる小さな予報器が手元に欲しくなりました^^; 今回はその試作記事を書きます。
筆者はこのところ省エネ型土壌水分(pF)計などに没頭中なのですが、出せる内容の開陳は少し先になりそう。そこで、このブログの記事を長らくさぼってしまってすみませんm(_ _ )m。久々に時間の取れる週末が来たので、気分転換も兼ね、天気予報器作りに早速トライをしました。
自分で気象観測して予報してもあまり当たりません(・・? 。ですからもちろんWebのオープンデータを使います^^; ので、逆にすぐできそうです。ネットを少し調べた限りは、世界の地域とデータを広くカバーするOpenWeatherMapの個人用APIを使うのがよさそうです。常に更新されています。
使い方はここで書くより、https://openweathermap.org/guideを直接見てみていただくのが早くて正確だと思います。丁寧に書かれていますし、ブラウザーの翻訳などで和訳しても読み易い感じですから。
上は画像なので赤字のリンクは効きません、リンク先で直接ごらんくださいね。
おおざっぱに言えば、まずeMailアドレスで個人登録をしてAPIキーをリクエスト。しばらく待つと登録したマイアカウントでAPIキーが受け取れます。この予報器では当地の3時間おきの予報を8個、つまり24時間ぶん表示することにしました。
この目的では5 Day / 3 Hour Forecastを使います。データとしては5日分が来ますが、なにせ、これより後の予報はだいぶ変わりやすいよう(??)で。
無料プランのアクセス頻度制限はありますが、その中で一番きつい値は1年間百万回以内。これは1分1回のアクセスなら十分守れる緩い制限ですね。表示器を複数使う場合は取得頻度を減らすとか、あるいは別アカウントで行うかでしょうか。
今回はマイコンにESP32-DevKitを使って試しましたが、あっさりと動きました\(^o^)/。試作段階ではありますが、ここで紹介したいと思います。LCDへの表示は少し複雑なので、まずはシリアルだけ出力する単純なプログラムの例をつけます。
/*****************************************************************
    Local Weather Forecaster  for ESP32 (Serial output)
      Original version V.00    Mar.5, 2022 (c) Akira Tominaga
      Functions:
        - Get forecast Json data via OpenWeatherMap API.
        - Extract required data and print to Serial monitor.
 * ***************************************************************/
#include "HTTPClient.h"
HTTPClient http;
#include "ArduinoJson.h"
// *** for accesses to Weather-Map API
const char* ssid = "Your SSID here"; 			// (1)
const char* password =  "Your password here";   	// (2)
const String API_URL = "http://api.openweathermap.org/data/2.5/";
//const String inq_Weather = "weather?q=Saitama,jp&APPID="; //(3)
const String inq_Fcst = "forecast?q=Saitama,jp&APPID=";     //(4)
const String key = "your API key given by openweathermap";  //(5)

void setup() {  // ***** ESP32 setup() ******
  Serial.begin(9600);  delay(100);
  WiFi.begin(ssid, password);  	// connect to WiFi network
  while (WiFi.status() != WL_CONNECTED) {
    delay(1000);
    Serial.print(".");
  }
  Serial.println("Connected to WiFi\n");
}
void loop() { // ***** ESP32 loop() *****
  http.begin(API_URL + inq_Fcst + key); // get weather fcst
  while (http.GET() <= 0) {      // if no response,
    Serial.print("x");           // then print x
    delay(3000);                 // try 3 sec later
  }
  String payload = http.getString();  //get json data
  // Serial.println(payload); 	// for debug only
  DynamicJsonBuffer jBuf;
  String json = payload;
  JsonObject& wD = jBuf.parseObject(json);
  if (!wD.success()) {
    Serial.println("parseObject Err");
  } else {
    // *** select from Json Buffer and show them
    Serial.println("");
    for (int dN = 0; dN < 8; dN++) {
      const char* sky = wD["list"][dN]["weather"][0]["main"].as<char*>();
      const double temp = wD["list"][dN]["main"]["temp"].as();
      const double hum = wD["list"][dN]["main"]["humidity"].as();
      const double pres = wD["list"][dN]["main"]["pressure"].as();
      // *** get Japan time by adding 9hours (i.e.: + 3 in the array)
      const char* dt = wD["list"][dN + 3]["dt_txt"].as<char*>(); // +9h = JST
      // *** replace weather expressions, as you like
      String Weather = String(sky);
      if (sky[2] == 'e') Weather = " Fine "; // Clear
      if (sky[3] == 'u') Weather = "Cloudy"; // Clouds
      if (sky[2] == 'i') Weather = " Rainy"; // Rain
      if (sky[0] == 'S') Weather = " Snowy"; // Snow
      String NN_temp = String(temp - 273.2); // convert absolute temp to Celsius
      NN_temp = NN_temp.substring(0, NN_temp.length() - 1); // cut 0.01 digit
      if (NN_temp.length() == 3) NN_temp = " " + NN_temp;
      // *** shorten calendar expression
      uint8_t iMM = (dt[5] & 0x0F) * 10 + (dt[6] & 0x0F);
      uint8_t iDD = (dt[8] & 0x0F) * 10 + (dt[9] & 0x0F);
      uint8_t ihh = (dt[11] & 0x0F) * 10 + (dt[12] & 0x0F);
      char MDDhh[12];
      sprintf(MDDhh, "%2d/%02d %02d:00", iMM, iDD, ihh);
      // *** output to Serial Interface
      Serial.print(MDDhh); Serial.print("  ");
      Serial.print(Weather);
      Serial.print(" "); Serial.print(NN_temp); Serial.print("℃, ");
      Serial.print(hum, 0); Serial.print("%, ");
      Serial.print(pres, 0); Serial.println(".hPa");
    }
    http.end();               // release resources
    delay(60000);             // ***update every 60S < 530,000/Y < rule/Y
  }
}
// *** end of program
上のソース内でコメントの右につけた(1)(2)(5)はご自分の環境に合わせてセットしてください。(3)、(4)には使いたい地点近くでOpenWeatherMapにある都市名等を指定してください。(3)の現在情報は今回使いませんのでコメントにできます。
これで、次のようなアウトプットがシリアルモニターに出ます。
 3/06 12:00  Cloudy 10.9℃, 23%, 1005.hPa
 3/06 15:00  Cloudy 10.8℃, 21%, 1005.hPa
 3/06 18:00  Cloudy  8.5℃, 26%, 1007.hPa
 3/06 21:00  Cloudy  6.0℃, 29%, 1010.hPa
 3/07 00:00   Fine   5.4℃, 30%, 1010.hPa
 3/07 03:00   Fine   5.0℃, 33%, 1012.hPa
 3/07 06:00   Fine   4.6℃, 33%, 1014.hPa
 3/07 09:00  Cloudy  7.5℃, 23%, 1016.hPa
APIを用いるこのプログラムではデータをJson形式で取得します。そのためJsonデータをこのプログラムではjBufにいったん収容することになりますが結構長いデータです。そして、”ArduinoJson”ライブラリーを使って、必要なデータのポインターを得ることで、使う内容だけを引っ張り出します。元のJsonデータはネスト構造をしていて分かりにくいため、いったんテキストにして机上でじっくり分解すると間違いを起こしにくいかと思います。
OpenWeatherMapのAPIデータでは、各要素の初めのほうに収容される時刻は”dt”で、UnixTime(1970年1月1日0時0分0秒からの経過秒数)が使われています。それから時刻に変換するのは手間です。そこでよく見ると、データの後ろの方にテキスト表示された”dt_txt”があるので、そちらを使うと楽です。ただし表示は国際標準時ですから、これを日本標準時に変更する必要があり、9時間を加えることになります。
9時間を加えるだけといっても、まともに計算しようとするなら、うるう年の判別などまで必要になってしまいます。ここで考え付いた方法は、常に3つ先(つまり9時間先)の”dt_txt”を使用する方法で、これで時間換算の手間を全て回避しています。
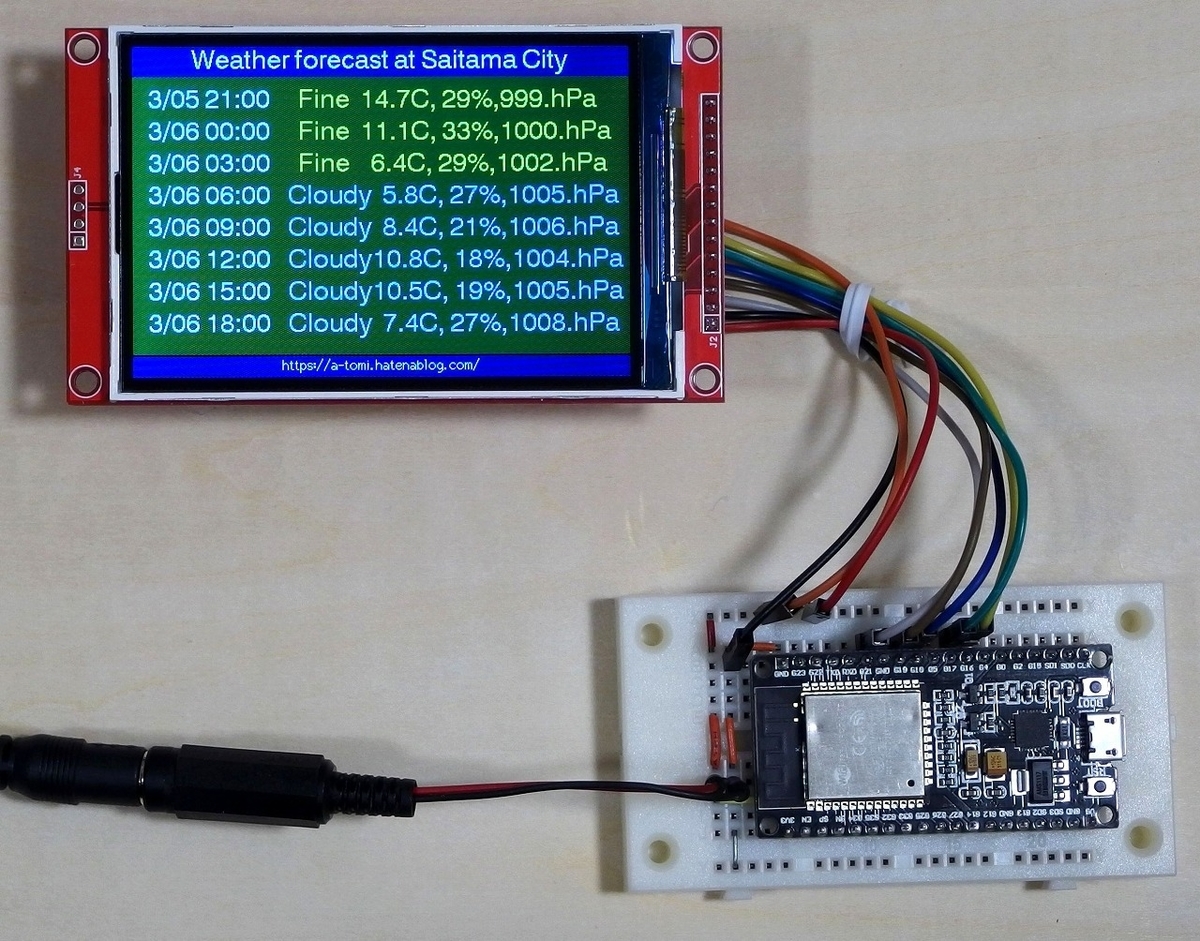
さて、次はカラーTFT-LCDに表示をします。デバイスは前に記事で紹介した3.5インチ、480x320ピクセル表示のものです。
https://a-tomi.hatenablog.com/entry/2021/05/24/105516
ESP32ではこのようなグラフィック表示のサポートがかなり安定してきたように思います。TFT-LCDでなくとも何でもよいわけですが、ここではESP32用Arduino-IDEライブラリーとして”TFT_eSPI()”を使っています。ただ、その際にスケッチと同一フォルダーの中に、その一部である“User_Setup.h”、と無料フォント指定をする“Free_Fonts.h”を、自分の環境に更新したものを同居させます(もしそうしない場合、他のデバイスを使うたびにライブラリー内のこれらを変更することになり、既に作ったものを使うときに改めて戻したりする必要がありそうですから)。

冒頭の写真のように、ESP32側で使うピン設定は、TFT側ピン配列と同順にしており、なるべくまとまるように設定していますが、WiFiと競合するピンを除けばどのようにでもできます。
こちらのプログラムは次のとおりです。
/*****************************************************************
    Local Weather Forecaster  for ESP32
      Original version V.00    Mar.5, 2022 (c) Akira Tominaga
      Functions:
        - Get forecast Json data via OpenWeatherMap API.
        - Extract required data and display on TFT-LCD.
      LCD (ILI9488 480x320) to ESP32 pins:(reflect to User_setup.h)
        SCLK-16, MOSI-17, DC-18, RST-19, CS- 21
 * ***************************************************************/
#include "HTTPClient.h"
HTTPClient http;
#include "ArduinoJson.h"
#include "TFT_eSPI.h"         // with "User_Setup.h"
#include "SPI.h"
#include "Free_Fonts.h"       // Include this into sketch folder
TFT_eSPI tft = TFT_eSPI();

// *** for accesses to Weather-Map API
const char* ssid = "Your SSID here";
const char* password =  "Your password here";
const String API_URL = "http://api.openweathermap.org/data/2.5/";
const String inq_Weather = "weather?q=Saitama,jp&APPID="; // set your city
const String inq_Fcst = "forecast?q=Saitama,jp&APPID=";   // set your city
const String key = "your API key given by openweathermap";

void setup() {  // ***** ESP32 setup() ******
  tft.begin();
  tft.setRotation(1);               // from 320x480 to 480x320
  tft.fillScreen(TFT_BLACK);        // background color
  tft.setTextColor(TFT_WHITE);      // set initial text WHITE
  tft.setTextDatum(TC_DATUM);       // Datum at top center
  header("Weather forecast at Saitama City"); // draw header
  footer("https://a-tomi.hatenablog.com/");   // draw footer
  tft.setTextColor(TFT_GOLD); tft.drawString("by Akira Tominaga", 239,150,4);
  WiFi.begin(ssid, password);       // connect to WiFi network
  while (WiFi.status() != WL_CONNECTED) { // if not connected
    delay(1000);                    // then wait and do again
  }
}
void loop() { // ***** ESP32 loop() *****
  http.begin(API_URL + inq_Fcst + key); // get weather fcst
  while (http.GET() <= 0) {        // if no response,
    delay(3000);                   // then wait and do again
  }
  String payload = http.getString(); //get Json format data
  DynamicJsonBuffer jBuf;
  String json = payload;
  JsonObject& wD = jBuf.parseObject(json);
  if (!wD.success()) {
    //Serial.println("Err at parseObject"); // for debug only
  } else {
    // *** select from Json buffer and show them
    tft.fillRect(0, 29, 480,269, TFT_DARKGREEN); // erase former data
    int xpos =  10, ypos = 40;  // set initial LCD postion
    for (int dN = 0; dN < 8; dN++) {
      const char* sky = wD["list"][dN]["weather"][0]["main"].as<char*>();
      const double temp = wD["list"][dN]["main"]["temp"].as();
      const double hum = wD["list"][dN]["main"]["humidity"].as();
      const double pres = wD["list"][dN]["main"]["pressure"].as();
      // *** get Japan time by adding 9hours (i.e.: + 3 in the array)
      const char* dt = wD["list"][dN + 3]["dt_txt"].as<char*>(); // +9h = JST
      // *** shorten calendar expression to MDDhh
      uint8_t iMM = (dt[5] & 0x0F) * 10 + (dt[6] & 0x0F);
      uint8_t iDD = (dt[8] & 0x0F) * 10 + (dt[9] & 0x0F);
      uint8_t ihh = (dt[11] & 0x0F) * 10 + (dt[12] & 0x0F);
      char MDDhh[12];
      sprintf(MDDhh, "%2d/%02d %02d:00", iMM, iDD, ihh);
      // *** show data on TFT-LCD
      tft.setTextDatum(TL_DATUM);  // Datum at top left
      tft.setTextSize(1); tft.setTextColor(TFT_WHITE);
      String ss = String(MDDhh);  xpos = 10;
      tft.drawString(ss, xpos, ypos, 4); // draw date and time w/Font-4
      // *** replace weather expressions, as you like
      String Weather = String(sky);
      if (sky[2] == 'e') {        // if Clear
        Weather = "  Fine  "; tft.setTextColor(TFT_YELLOW);
      }
      if (sky[3] == 'u') {        // if Clouds
        Weather = "Cloudy"; tft.setTextColor(TFT_LIGHTGREY);
      }
      if (sky[2] == 'i') {        // if Rain
        Weather = " Rainy "; tft.setTextColor(TFT_SKYBLUE);
      }
      if (sky[0] == 'S') {        // if Snow
        Weather = " Snowy "; tft.setTextColor(TFT_SILVER);
      }
      // *** prepare and output strings
      String stemp = String(temp - 273.2); // convert temp-K to Celsius
      stemp = stemp.substring(0, stemp.length() - 1); // cut 0.01 digit
      if (stemp.length() == 3) stemp = "  " + stemp; // fix length
      String shum = String(hum); shum = shum.substring(0, shum.length() - 3);
      String shPa = String(pres); shPa = shPa.substring(0, shPa.length() - 3);
      ss = Weather + stemp + "C, " + shum + "%," + shPa + ".hPa";
      // *** output weather
      xpos = 150;                     // set xpos for weather
      tft.drawString(ss, xpos, ypos, 4);  // Draw text with Font-4
      ypos += 31;
    }
    http.end();               // release resources
    delay(60000);             // ***update every 60S < 530,000/Y < rule/Y
  }
}
/********************************************************************
    User defined functions
 *  *****************************************************************/
// ***** show screen header *** header(string) *****
void header(const char *string) {
  tft.setTextSize(1);
  tft.fillRect(0, 0, 480, 30, TFT_NAVY);
  tft.drawString(string, 239, 2, 4); // Font 4 with default bg
}
// ***** show screen footer *** footer(string) *****
void footer(const char *string) {
  tft.setTextSize(1);
  tft.fillRect(0, 300, 480, 320, TFT_NAVY);
  tft.drawString(string, 239, 300, 2); // Font 2 for fast drawing with background
}
// ***** end of program *** 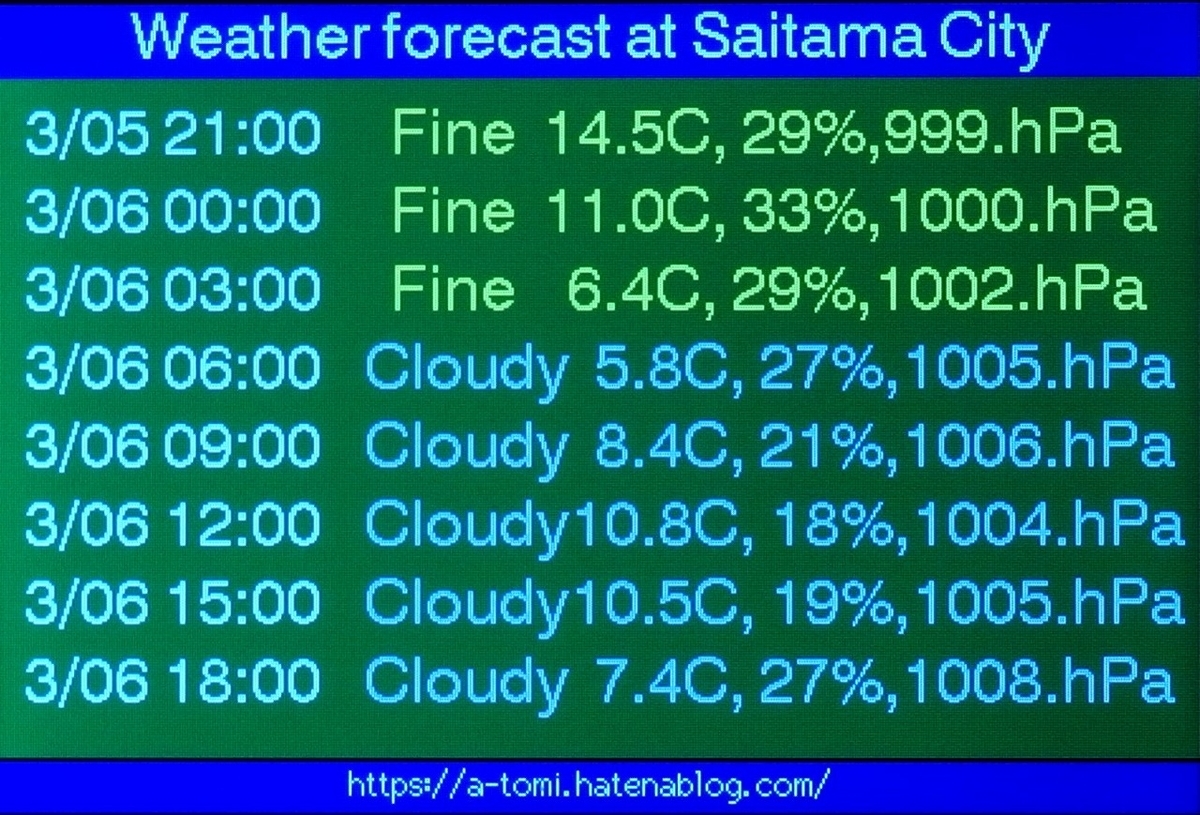
以上、ごく簡単な紹介でしたが、もし皆様の何らかのお役に立てばとても幸いです。
©2022 Akira Tominaga, All rights reserved.